Platform Requirements
KiX supports various popular game development environments. Developers can use tools like Unity, Cocos Creator, or HTML5, following specific export configurations to ensure compatibility.
Unity Setup for WebGL Output
- Open the Unity project and ensure all necessary resources are imported.
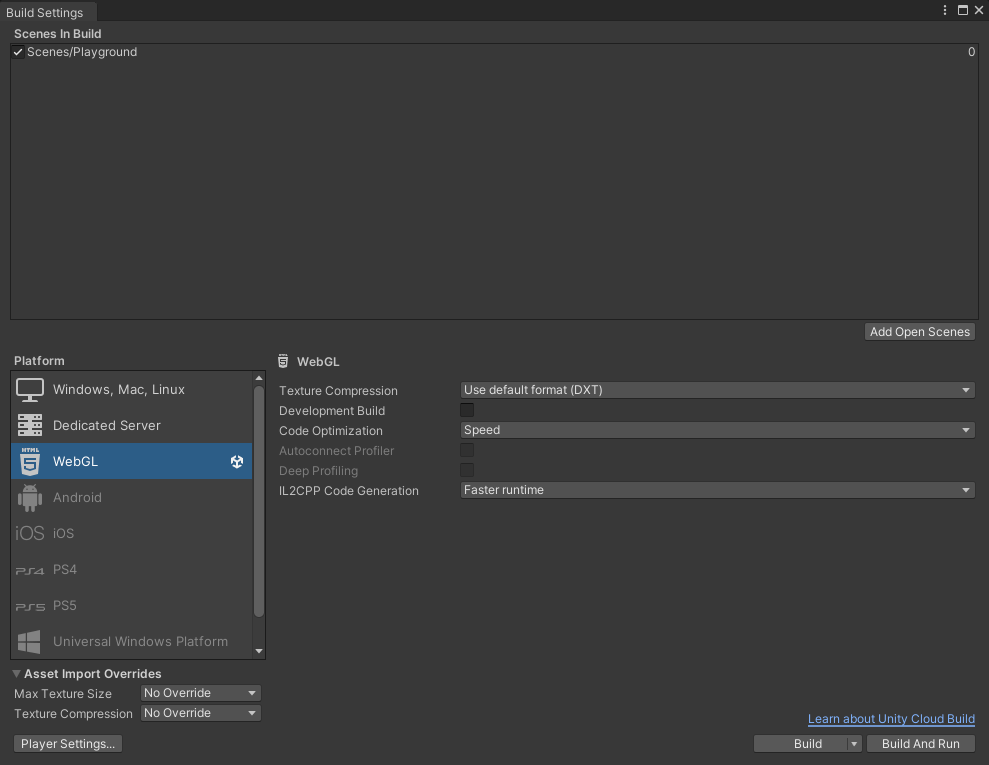
- Go to File > Build Settings, select WebGL as the target platform, and click Switch Platform.
- Adjust Player Settings (resolution, compression) to optimize performance.
- Click Build to generate the WebGL output folder containing HTML, JavaScript, and WebGL data files.
Note: These files are required for deployment on KiX. Configure the new project as shown in the image below:
Configure the new project as shown in the image below:
Note: The WebGL folder will contain HTML, JavaScript, and WebGL files required for deployment on KiX.
Once game development is complete, export using the following configuration:
Lobah has released a Unity plugin to help Unity developers optimize textures and bundles and better integrate with the Lobah platform.
Download the Unity plugin: Kix AssetOptimizationTool v0.1.5
Unity Plugins: Asset Optimization Tool
Plugin Import Instructions: Open Windows -> PackageManager, click the ‘+’ icon in the top-left corner, select ‘Add Package from disk’, browse to the root directory of this plugin, and select the package.json file. To use the plugin, click the ‘AssetOptimization’ button in the menu bar.
Texture Compression Tool
The Texture Compression Tool is a visual texture resource classification and management tool. This tool is designed to facilitate the management of textures in a project. It allows users to view the memory usage, compression format, dimensions, and other information of textures. It also supports batch modification of texture compression formats, maximum dimensions, and mipMap settings. First, select any directory in the Project panel and click the BrowseAllTexturesInDirectory button. If the directory contains textures, a list of all textures in the directory will be displayed, as shown in the figure below:
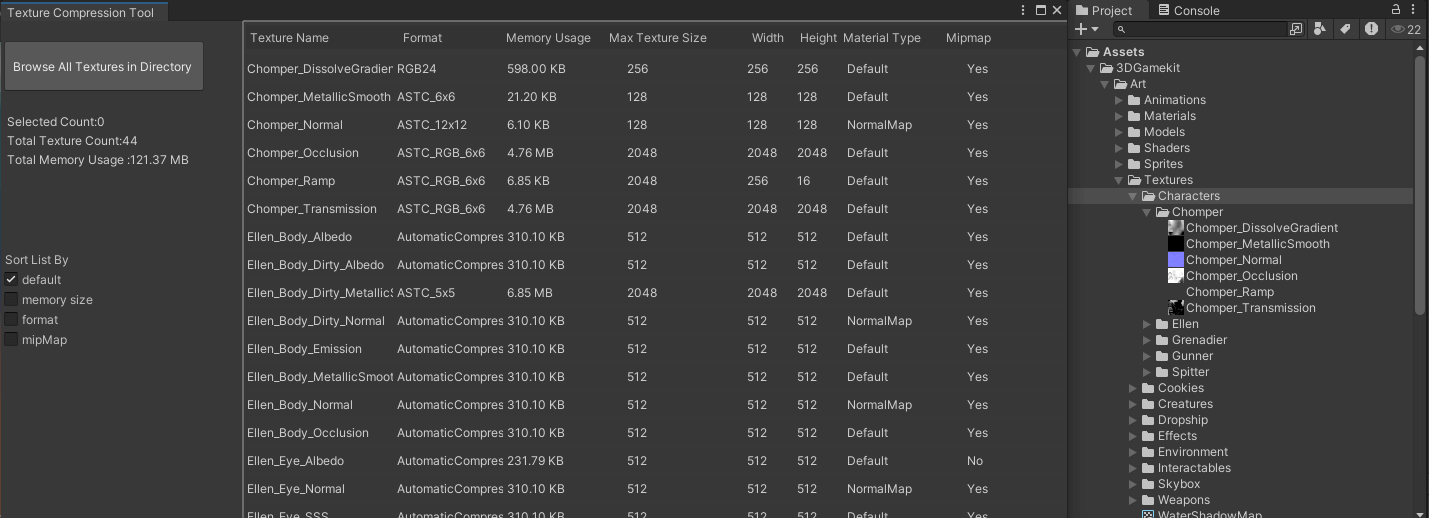
Note: If you click the BrowseAllTexturesInDirectory button without selecting any directory, it will list all textures in the project. If there are many textures in the project, this step may take some time.
The left side of the list displays the overall information of the textures in the list, including the number of selected textures, the total number of textures, and the total memory usage of the textures. The list also supports sorting to facilitate user search, which can be sorted by default order (i.e., folder order), memory usage, compression format, or mipMap.
The list is divided into eight columns, which display the texture name, compression format, memory usage, maximum size, width, height, texture type, and whether mipMap is enabled. For resource optimization, the three most important pieces of information are memory usage, compression format, and maximum size. The compression format and maximum size of the texture determine its memory usage.
When you select any item in the list, three new buttons will appear on the left side: Change Format, Change Max Texture Size, and Enable MipMap. Their functions are to change the compression format, change the maximum size, and enable or disable mipMap, respectively. The list supports multi-selection for batch operations using the Shift or Ctrl keys, as shown in the figure below:
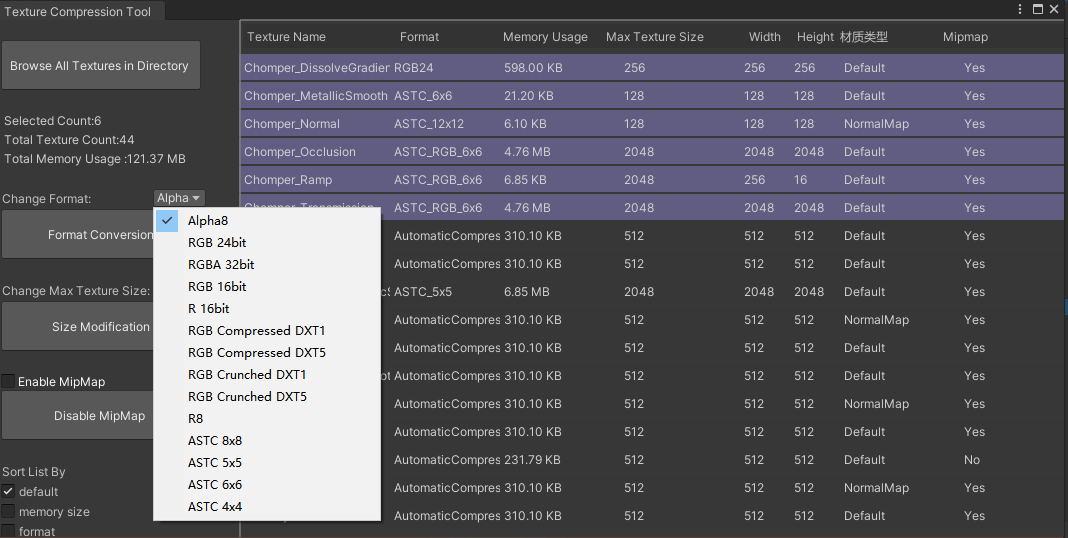
This plugin supports the selection of various commonly used texture compression formats. For WebGL mobile platforms, ASTC is usually recommended. ASTC is an advanced compression format that supports multiple different compression ratios, allowing for a good balance between quality and file size. This plugin also supports modifying the maximum size of textures, ranging from 4096 to 32. Since WebGL platforms only support up to 2048x2048, it is recommended to use textures of 1024x1024 or 512x512 for compatibility and performance, which can improve loading speed and reduce memory usage (for some textures, 256x256 or smaller can be used depending on the actual project situation). This plugin also supports one-click enabling or disabling of mipMap for textures. MipMap is a texture optimization technique primarily used for texture mapping in graphics rendering. It provides multiple resolution versions of the same texture to improve rendering performance and visual quality. After enabling mipMap, Unity selects the most suitable mipMap level based on the distance of the object from the camera during rendering. If the object is far from the camera, a lower-resolution mipMap is automatically used, which reduces GPU computation and memory bandwidth usage, thereby improving rendering performance. However, we only recommend enabling this option for textures with high resolution and rich details that need to maintain visual quality both up close and from a distance.
AssetBundle Manager
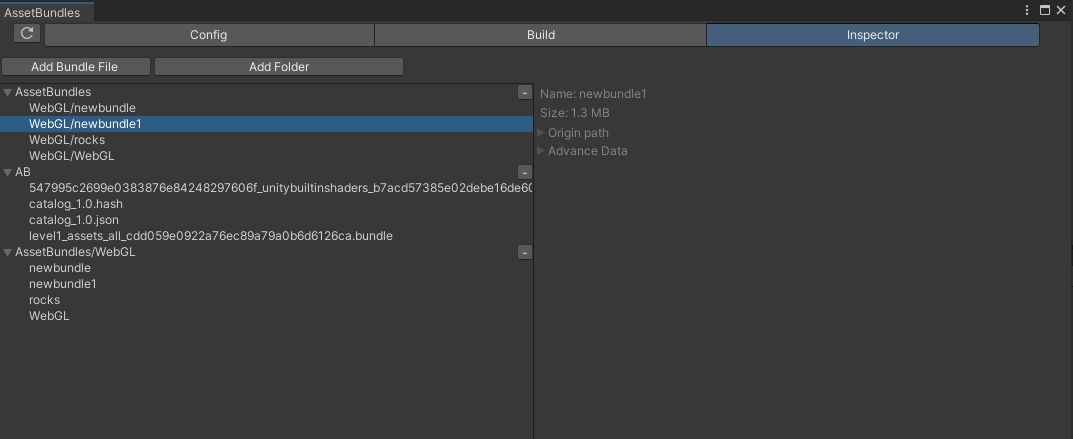
The AssetBundle Manager is a visual packaging tool that supports the creation, management, packaging, preview, and other practical functions of resource packages, helping users to more conveniently manage the packaging process. The main menu of this tool is located at the top and is divided into three categories: Configuration, Generation, and Inspection, corresponding to three pages.
✅ Configuration Page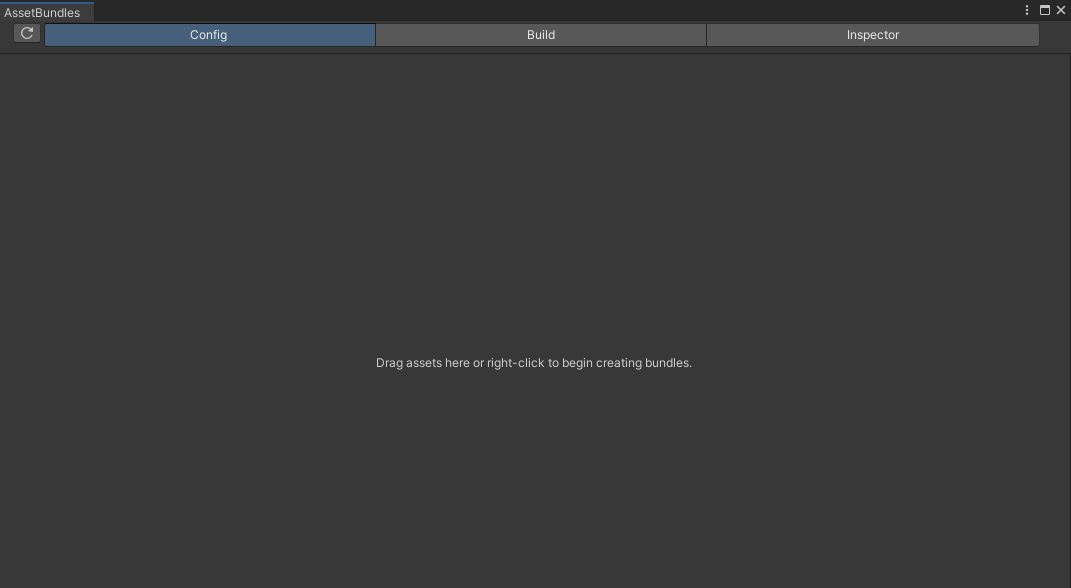
When no resource packages have been configured, this page will prompt the user to drag resources from the Project panel to generate a resource package or to create a new resource package by right-clicking with the mouse. The principle of dragging resources to generate a resource package is the same as marking resources as AssetBundle or Addressable. Resources can be prefabs, textures, materials, models, scenes, etc. Here, we take the prefab "rocks" as an example and drag it into the Config panel.
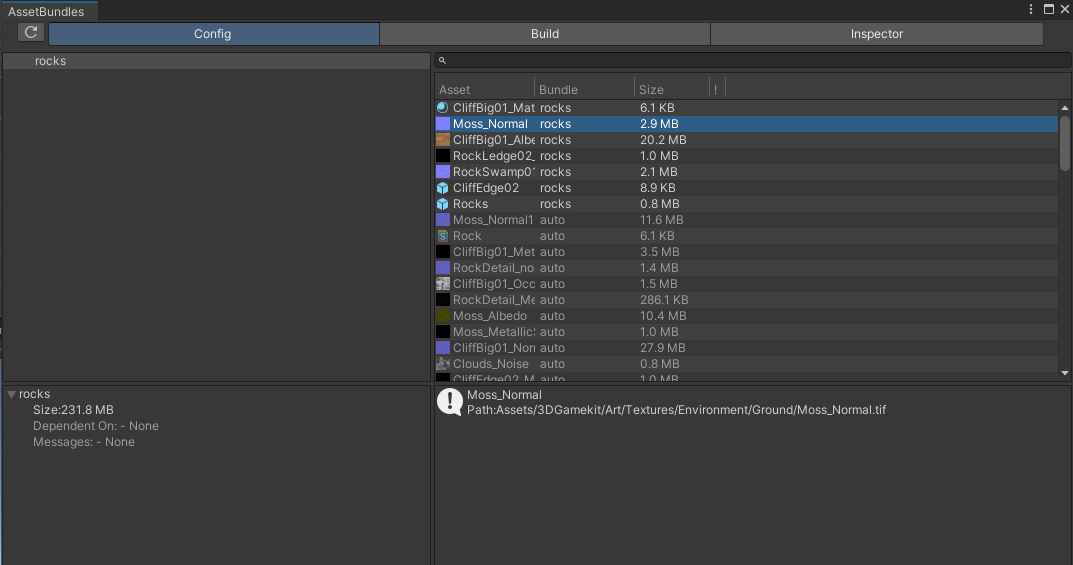
At this point, the Config panel is divided into four modules. The upper left corner is the list of AssetBundles. When any resource package is selected in this list, the lower left corner will display the details and dependency information of the selected resource package. The upper right corner lists the resources contained in the selected resource package (for example, a prefab may include multiple resources such as materials, textures, models, audio, etc.). When any object in the upper right corner list is selected, the lower right corner will display the properties of the selected object, as shown in the figure below:
New Resource Package: Right-click in the upper left corner blank area to add a new empty package or folder for creating your custom resource package. You can drag any resource from the Project panel into the custom package, or when a resource package is selected, drag one or more resources from the upper right corner list into the custom package. During the resource movement process, the plugin will automatically find all dependencies of the resource and package them together.
View Resource Details: The right-side list has four columns, which are resource name, the resource package it belongs to, size, and hint information. If a row is gray and its resource package is "auto," it means this resource is a dependency and is automatically packaged into a resource package. For example, all texture resources included in a material are dependencies. If you add this material to resource package A, all texture resources it includes will be automatically packaged into A and displayed in gray.
Detection and Repair of Duplicate Resources: This tool automatically detects whether dependent resources are duplicated across multiple resources. Still taking the material as an example, there may be multiple materials sharing a single texture. If these materials are placed into different resource packages, the same texture will be packaged multiple times, causing unnecessary memory waste. Next, let's conduct a test by dragging a material from the rock into the newly created resource package "test," and you will find that some resources in the right-side list are marked with yellow warnings, as shown in the figure below:
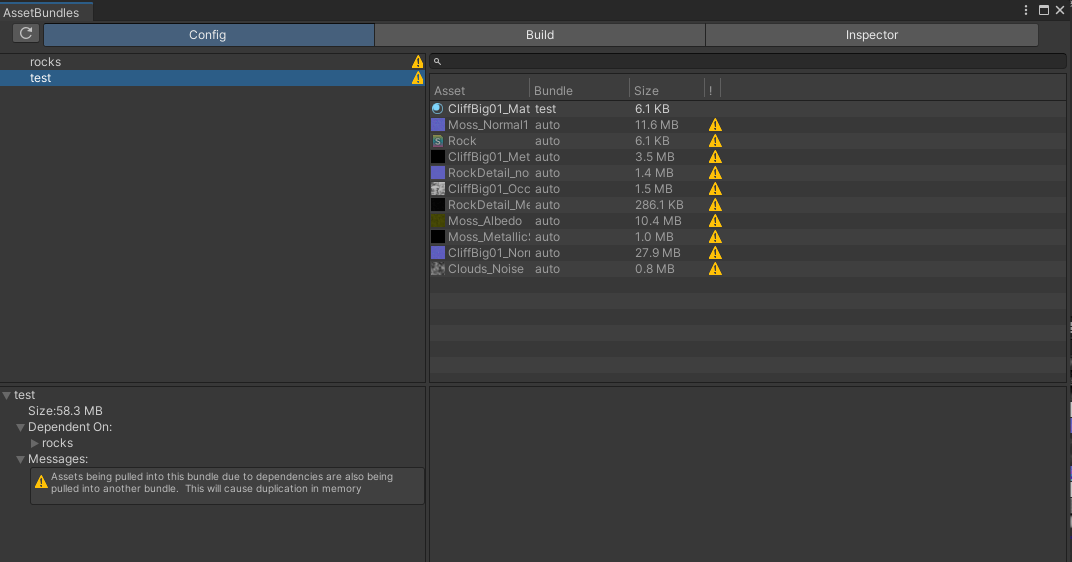
These yellow warnings mark resources that are duplicated. You can choose to remove or move these resources to a new package. Right-click on any resource package in the upper left corner and select "Move duplicates to new bundle" to automatically move the duplicated resources of that package to a new package. The right-click menu also includes the following common functions: Add Sibling, Convert to Variant, Rename Package, Delete Package.
If there are any erroneous resources in the package, an error icon will appear in the right-side list. Hovering the mouse over it will display the error details.
✅ Build Page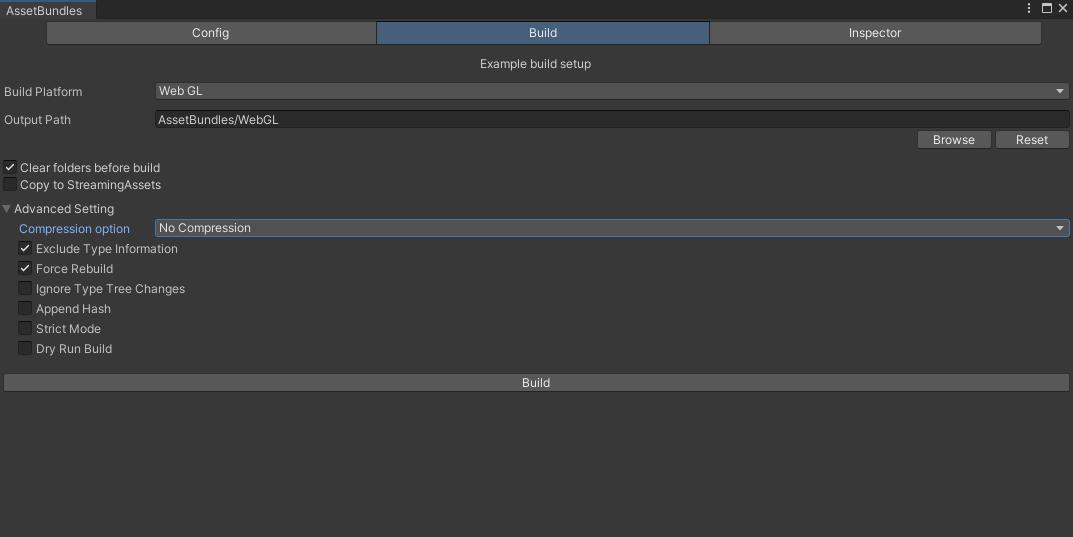
On this page, you can select the target build platform (default is WebGL) and the output path (default is AssetBundles/). There are two optional settings available for users:
- Clear folder contents and regenerate
- Copy to StreamingAssets folder for convenient loading during testing
🚀 Local Loading Test of AB Packages Click the Build button to start generating AssetBundle files. Check the generated folder and you will find, in addition to the AB package files, there are also corresponding manifest files. These files are configuration files required for loading. For example, to load AssetBundles from the StreamingAssets folder, the core code is as follows:
 private void Start()
 {
     GameObject rock = LoadAsset<GameObject>("rocks", "rocks");
     Instantiate(rock);
 }

 public T LoadAsset<T>(string abName, string assetName) where T : Object
 {
     AssetBundle ab = null;
     string abResPath = Path.Combine(Application.streamingAssetsPath, abName);
     ab = AssetBundle.LoadFromFile(abResPath);

     T t = ab.LoadAsset<T>(assetName);
     return t;
}Attach this script to any object in the scene, click Play, and you will see the loaded prefab in the editor: 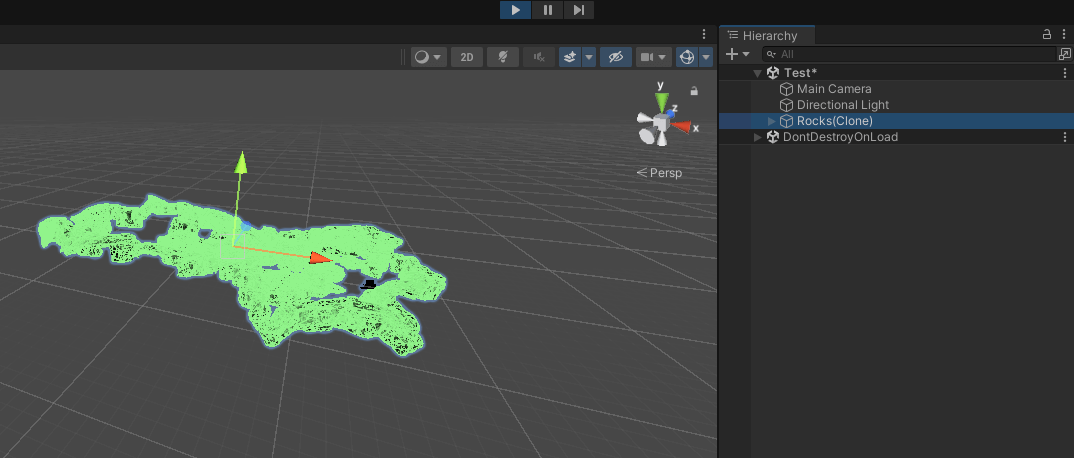
If you want to load online AB packages via the network, simply use the following method (fill in the URL of the AB package):
 private IEnumerator LoadAssetBundleFromURL(string url, string abName)
  {
      using (UnityWebRequest www = UnityWebRequestAssetBundle.GetAssetBundle(url))
      {
          yield return www.SendWebRequest();

          if (www.result != UnityWebRequest.Result.Success)
          {
              Debug.LogError($"Error loading AssetBundle: {www.error}");
              yield break;
          }

          AssetBundle ab = DownloadHandlerAssetBundle.GetContent(www);
          GameObject asset = ab.LoadAsset<GameObject>(abName);
          Instantiate(asset);
      }
}🚀 Loading Dependencies Test In the above loading test, we only loaded the AssetBundle file (the file without an extension) and did not load its dependency files (i.e., the file with the same name but with a .manifest extension). As mentioned earlier, in actual projects, we may encounter situations where multiple prefabs share common parts, so we can package the common parts as a separate AssetBundle. Other different parts will then have a dependency on this common part. When loading, we must also load the dependencies; otherwise, resource loss will occur, and the prefab will not display as intended. First, add a new method to generate the AssetBundleManifest for later dependency lookup:
 private AssetBundleManifest m_manifest;
 public void Init()
 {
     string streamingAssetsAbPath = Path.Combine(Application.streamingAssetsPath, "WebGL");
     AssetBundle streamingAssetsAb = AssetBundle.LoadFromFile(streamingAssetsAbPath);
     m_manifest = streamingAssetsAb.LoadAsset<AssetBundleManifest>("AssetBundleManifest");
}This method should be called at the start of the program. Its purpose is to locate the file named WebGL (the specific name depends on your build platform; it is automatically generated by the plugin) and load it to generate the AssetBundleManifest.
Next, enhance the LoadAsset method to load all dependencies of the target package:
public T LoadAsset<T>(string abName, string assetName) where T : Object
{
    AssetBundle ab = null;
    string abResPath = Path.Combine(Application.streamingAssetsPath, abName);
    ab = AssetBundle.LoadFromFile(abResPath);

    //New
    string[] dependences = m_manifest.GetAllDependencies(abName);
    int dependenceLen = dependences.Length;
    if (dependenceLen > 0)
    {
        for (int i = 0; i < dependenceLen; i++)
        {
            string dependenceAbName = dependences[i];
            Debug.Log("dependName:" + dependenceAbName);

            string _path = Path.Combine(Application.streamingAssetsPath, dependenceAbName);
            AssetBundle dependenceAb = AssetBundle.LoadFromFile(_path);
        }
    }

    T t = ab.LoadAsset<T>(assetName);
    return t;
}This plugin also provides some advanced settings that may be useful during packaging:
- Compression: Choose between no compression, standard LZMA, or block-based LZ4 compression.
- Exclude type information: Do not include type information in the resource package.
- Force rebuild: Rebuild the packages that need to be built. This is different from "clear folder" because this option does not delete packages that no longer exist.
- Ignore type tree changes: Ignore type tree changes during incremental build checks.
- Append hash: Append a hash to the resource package name.
- Strict mode: If any errors are reported during the build process, the build will not be allowed to succeed.
- Dry run build: Perform a dry run build.
✅ Inspector Page
The paths you built through the Build page will be automatically added here. The functions of this page are as follows:
- Click "Add File" or "Add Folder" to add packages to inspect.
- Click the "-" next to each line to remove the file or folder. Note that you cannot remove individual files added via a folder.
- Select any listed package to view detailed information, including: 1.Name 2.Size on disk 3.Source asset path: Assets explicitly added to this package. Note that this list is incomplete for scene packages. 4.Advanced data: Including preload table, container (explicit assets), and dependency information.
Since iOS has some limitations on Unity Web game support, we have designed the following guidelines for Unity developers to quickly integrate games developed with Unity into the Lobah platform.
Please try to optimize your Unity WebGL game according to the documentation and debugging information. Lobah APP will check the game. If the game is not compatible with IOS, it may only be provided on Android version.
Compatibility Assessment Checklist
| Capability | Supported? | Solution |
|---|---|---|
| Basic Modules of Unity | Supported | Supports basic modules such as animation, physics, AI, UI, etc. |
| Rendering Pipeline | Supported | Supports both the standard rendering pipeline and URP |
| Pure TypeScript | Supported | Requires iOS 14.5 or later, supports JIT |
| Unity Audio | Supported | Basic UnityAudio capabilities are supported along with FMOD plugin support (use UnityAudio for long audio). However, Wwise is not supported. |
| Networking System | Adjustments Needed | Uses UnityWebRequest for HTTP, WebSocket communication alternatives (like the open-source UnityWebSocket plugin) for TCP |
| Rendering Interface | Supported | Only supports WebGL 1.0 (equivalent to OpenGLES 2.0) |
| Multithreading | Not Supported | Remove multithreading usage, use alternatives like asynchronous methods instead. |
Export Requirement
Unity Setup for WebGL Output
- Open the Unity project and ensure all necessary resources are imported.
- Go to File > Build Settings, select WebGL as the target platform, and click Switch Platform.
- Adjust Player Settings (resolution, compression) to optimize performance.
- Click Build to generate the WebGL output folder containing HTML, JavaScript, and WebGL data files.
Note: These files are required for deployment on KiX. Configure the new project as shown in the image below:
Configure the new project as shown in the image below:
Note: The WebGL folder will contain HTML, JavaScript, and WebGL files required for deployment on KiX.
Once game development is complete, export using the following configuration:
Configure for Better WebGL Compatibility
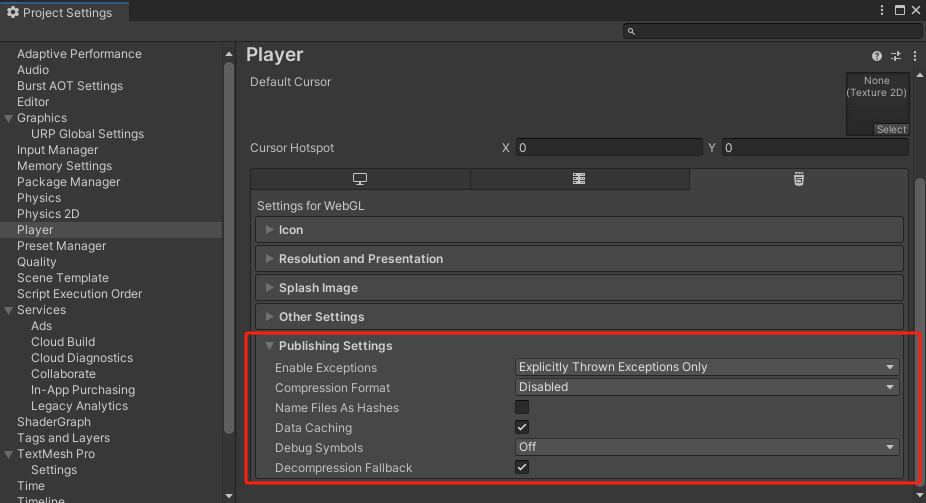
- Enable WebGL 2.0 (Fallback to WebGL 1.0 if needed) iOS Safari supports WebGL 2.0 but has limitations. In Unity, go to: Edit > Project Settings > Player > WebGL > Other Settings Enable WebGL 2.0, but also enable WebGL 1.0 fallback for broader compatibility.
- Increase Memory Size iPhones often run out of memory with WebGL. In Unity, set a higher memory limit: Edit > Project Settings > Player > WebGL > Other Settings > Memory Size Increase it to 256MB or 512MB, but not too high (iOS may crash).
- Change the texture compression format In Project Settings → Player → WebGL → “Texture Compression Format,” choose ETC2 or ASTC. (Unity 2021+ with URP strongly recommends ASTC for better mobile compatibility.)
- Check/remove incompatible shaders If “Hidden/VoxelizeShader” or “HDRDebugView” are URP debug shaders, try going to Graphics Settings → “Strip Unused Shader Variants” to reduce pointless subshaders.
- Optimize Build for Mobile Disable exceptions: Edit > Project Settings > Player > WebGL > Publishing Settings > Enable Exceptions > None Enable Data Caching: Edit > Project Settings > Player > WebGL > Publishing Settings > Data Caching Disable Debug Mode for better performance.
- Fix iOS-Specific Issues iOS Safari blocks certain Unity features: Disable Touch Input Delay: Edit > Project Settings > Player > WebGL > Other Settings > Input Handling > Both Allow Fullscreen Mode: Some games crash if they start in fullscreen mode. Disable fullscreen in Unity settings.
- Test with WebGL Loader Optimization Use compressed textures and LZ4 compression for smaller builds. Use Fastest Graphics API in WebGL settings.
Common Causes And Fixes
A. iOS WebGL Might Be Running Out of Memory
✅ Check Memory Usage
- Open iPhone Safari Web Inspector.
- Check the JavaScript Heap Size.
- If it exceeds 256MB, iOS may force WebGL to crash.
🚀 Fix
- Lower texture resolution further (use 256x256 textures where possible).
- Reduce Mesh complexity (if using high-poly models).
- Use Crunch Compression for textures in Unity (
ASTC 4x4orETC2).
B. IndexedDB Fails to Load
✅ Check if your game is using IndexedDB (which may fail on iOS Safari)
- IndexedDB is often blocked in Private Browsing Mode in Safari.
- Some Unity builds automatically use IndexedDB for caching.
🚀 Fix
- Go to Unity WebGL Player Settings →
Player → WebGL → Publishing Settings. - Set "Data Caching" to Disabled.
- Add this to your
index.html:javascriptif (window.indexedDB) { console.log("IndexedDB is supported"); } else { console.warn("IndexedDB is NOT supported - potential issue on iOS"); }
C. iOS Blocks Audio Without User Interaction
✅ Check if Audio is Failing
- iOS blocks autoplaying audio.
- Unity WebGL tries to start audio automatically, which may crash the game.
🚀 Fix
- Modify your
index.htmlto only enable audio after user interaction:javascriptdocument.addEventListener("touchstart", function () { if (typeof UnityAudio !== "undefined") { UnityAudio.resume(); } }); - Ensure no audio sources play automatically in Unity.
D. WebGL Context May Be Lost
✅ Check if Safari Logs "WebGL context lost"
- Some iPhones fail to restore WebGL after a tab switch or memory spike.
🚀 Fix
- Add this to your Unity WebGL template:javascript
canvas.addEventListener(
  "webglcontextlost",
  function (event) {
    event.preventDefault();
    alert("WebGL context lost, please reload the page.");
  },
  false
);
E. JavaScript Errors
✅ Check if JavaScript Code is Crashing
- Open the Web Inspector in Mac Safari (
Develop→iPhone→Console). - Check for JavaScript-related errors.
🚀 Fix
- If you see
Uncaught TypeError, ensure Unity is loading properly:javascriptwindow.onerror = function (message, source, lineno, colno, error) { console.error("Global Error:", message, "at", source, "line:", lineno); };